About Me

Monday, April 30, 2012

Sunday @ the Flea Market

I swear this dress makes me look super preggo and somewhat unflattering but whatevs :) It was a really hot day and we went to the flea market for a good walk and to much on fruit at the farmers market.  I swear the Farmers Market at the flea market has the best tasting oragnes I've ever had. I can eat 3-4 in one sitting and then some! 

 Mom was looking for an Apron but when they told her this blue one there above cost $15 bucks, she was like "a la chingada, mejor compro tela y los hago yo!" haha in other words..."psh, hell no I rather make my own!" and we did just that. We bought 2 yards of fabric for $3 bucks and have plenty for 2 aprons! How you like them apples! lol.

 Since I got pregnant, I dont crave ice cream the way I did before I was preggo.  I was eating ice cream left and right every other day and sometimes twice a day.  It's rare I eat ice cream nowadays but I saw this man eating this hug ass cone of ice cream and got the sudden urge to have one myself.  While waiting in line I couldn't decide wheather I wanted vanilla or strawberry, so I opted for a scoop of each! lol It was delish!
 And I wouldn't be me, had I not shared with my mommy of course! She only wanted a taste and my niece was eyeballing my ice cream but she said "no thanks" so I'm like "Psh, More for me!" But in reality, I ended up eating only the vanilla scoop and mom had the strawberry one since I couldn't finish it, I bet if I wasn't preggo I would've gobbled that sucker up in a heartbeat! lol

My lovely nice Maritza

Madre Querida

And here is my lovely mother Eva! I love her so much!! She looks quite mad and seriuos here but she's not either. She's the best thing that happened to me, or should I say I'm the best thing that happened to her? lol J/k <3 My baby is named after her, Eva :) 


I was beat by the end of the day and as soon as we got home I instantly crashed out in bed for a few hours, the day was hot and it wore me out completely.  My family was laughing at me on the way back home because I was falling asleep and apprently my head was bobbing and that was quite funny for them lol. I can't admit I havn't laughed myself when this happens to someone I know. It's funny to see them try to act like nothing happened trying to hold yoru head still while you fall asleep when all of a suddent he weight of yoru head beats you lol.

Anyway, till next time!
xoxo
Mayra

Diaper Covers!


Made my baby this diaper cover using a pattern by Danamadeit.  I plan on making more of these as I make her other clothes and just so she has maching chonies to wear with her dresses. I would much rather her show off these cute diaper covers than the actual diaper regardless of any "cute" prints they now come with. These are extremely cute and super inexpensive to make and with the pattern, I can make these for months on end as she grows into a toddler.


Made this one in particular to match the itty bitty baby dress I made her a few weeks ago. And these were the first thing I made using my new overlock machine which I LOVE! gives my projects a super nice clean finish that looks professional and keeps my projects from fraying.

BTW, cost me less than $99 cents to make these babies...again...I used a precut fat quarter from Walmart, and I still have bit of fabric left for making a bow or using as an applique on another project. If I've learned anything from sewing, it's to save any scraps of fabric because you don't know when they'll come in handy.

Till next time!
xoxo
Mayra

Simplicity New Look Baby Dress Pattern E6793


I wanted to share my first baby dress using an industrial pattern.  I used Simplicity's New Look Pattern for Baby's in E6793 in sizes Newborn through Large.  I made a size small dress .  I was afraid that the pattern for a newborn would be too small since I don't know just how big my baby will be and I would rather wait for my baby to fit into the dress than not fit at all. 
 
I chose a white eyelet fabric for the main dress and happened to have pink polka dot fabric to use as the lower panel and the applique's on the dress so it ended up matching the picture on the front pattern packaging.  I can easily make other dresses with the same pattern and different fabric to give it a different look, and even create the other styles as well.  The possibilities are endless.

Prepping pattern pieces for cutting


Zig Zag stitch on applique's
Being a beginner at sewing using industrial patterns I must admit it got quite confusing at times.  Some of the directions didn't make sense at all and on more than one occassion I ended up sewing things wrong.  Lucky for me, sewing is similiar to painting...you can always cover up your mistakes with new paint OR in the case of sewing...grab a seam ripper and pick up where you last messed up.  I ended up ripping things apart just to start over again plenty of times but from each mistake came a new lesson and a new experience.  Through my mistakes I've learned to read the pattern differently or should I say correctly.  Someone didn't just come up with the expression "practice makes perfect" for no reason! It's really true.

We were at Walmart on Friday and while I was looking for a few items, Vic and my niece came across these baby shoes. 
Baby Shoes to Match :)


A perfect match for the dress I was currently working on :) I just hope they both fit at the same time hehe.


Mom tied the bows - she's the expert!
You should have seen the way it looked before my mom tied bows at the shoulders. They were one sloppy mess! She used to work at a fancy chocolate factory that decorated their chocolate baggies with bows so you know she had to check my ass and teach me a lesson about "presentation" and how to properly tie a bow on a baby girls dress! lol Thank Mom :) Baby Eva will love you that much more for it!


Now that I got one design out of the way, I'm working on my next project. Views C & D, the baby pants and top.  So far I've got the fabric cut out for the baby pants.  I started sewing the seams last night but already came across my first mistake.  The baby pants only have like 5 steps to make and I'm already stuck at one! Oh well, nothing a nice lil seam ripper can't fix!  Because I already made the baby dress, I'm assuming the top will be pie to make but who knows! We'll see how well that goes.
Working on next project: View D: Baby Pants!
 Baby dress took me about 2 days to make, and so far I've put in about an hour's work on the pants...let's see just how long it takes me to figure these babies out.  I'm making the baby pants a sea green and the top will be white with brown and turquoise and sea green as well to match. Can't wait to show you guys the results!
Pinned pattern pieces to fabric
See you soon!
xoxo
Mayra


Wednesday, April 25, 2012

Extremely focused-Do not disturb


Here is another picture Vic took of me while I was working on a project.  I just got a brand new serger machine and I was frustrated because I couldnt thread it properly.  Luckily for Youtube, I found a step by step guide on how to properly thread my machine :)

But besides that...once I sit on that table, I am pretty much consumed by whatever it is that I'm working on, and unless I have to pee, drink water, or eat..I wont get up...sometimes I dont even have to get up to eat cuz Vic is always spoiling me by bringing anything to me :) Love him <3

Another Baby Bib


This was actually the first thing I made for my baby after I dusted off the sewing machine. I got the idea from Crafty Gemini.  I love her tutorials and videos, she inspires me to be more crafty too.  I got inspired by her to do this bib when I watched her video on making a baby bib.  I followed all her directions with the exceptioin of her pattern, I used my own by folding a bib I currently had in half.

 At first it was a little rugged and I wasn't happy with the way it looked.  I had intended it to be a double sided bib but was not happy with my results.  I hadn't used my sewing machine in such a long time that my stitches were unbalanced and the whole thing looked crazy.  I left alone for a few weeks. This is what it looked like then.

A few weeks later after stopping by Wal*Mart and picking up this roll of ribbon for only  $1 I decided to attach it to the hem of my baby bib to give it more of a complete look.  I'm happier with the results today than I was when I first "finished it".  Because some of my stitches were so off balance, I decided this would only have one face and not two sided as originally planned and avoid having to show the ugly side with the unbalanced stithces.

I made my own pattern for this bib by tracing a bib I had originally purchased.  I simply folded the bib in half length wise and traced the shape onto a manilla folder which I then cutt out and traced that shape onto my fabric on the fold.  After tracing the bib onto my fabric choice, I cut the shape out and with wrong sides facing me, I began to stitch all around.  I left a small opening to flip the whole thing inside out and then stitched the opening closed.

Not bad for my first bib I would say :)  I'm waiting on some snaps to use on this bib for the closure on the ends, other than that I can say this Bib is all done :)

Monday, April 23, 2012

Itty Bitty Baby Dress - Complete!

So I've finished my baby girls Itty Bitty Baby Dress and I am absolutely in love with the results! I've gotten great compliments on it and been told it looks like a dress strait out of a department store (Thanks Taya!) Another thing people can't beleive is that it all cost under $5 bucks to make and it was super easy!

I got the pattern and idea from Rae over at made-by-rae.com.  You can find the free pattern and step by step instructions here.  You can download the PDF instructions there, print them out like I did, or do them step by step from your phone/computer.  Rae also has a toddler version incase you're past the baby phase and have a toddler and want to get the same dress results.

The instructions are extremely easy! You don't require a fancy sewing machine or fancy fabric (unless you have one and prefer fancier fabric). I made mine from 2 different fat quarters that only cost me $99 cents each at Walmart.  I used Maxi Bias Piping which cost me around $1.30, but you opt for making your own. I used flannel I had laying around for the inner lining, but considered upcycling one of Vic's old T-shirts that he doesn't use anymore so any soft and lightweight material will do, and that's if you want to add a lining-- it's not necessary.  I only added lining to the upper portion of the dress.

Here is my finished product with a picture of baby Eva's teddy modeling the dress for you. (BTW, I made the Teddy's head accessories as well).

 BTW, I decided not to go with the ties on the shoulder straps and opted for a completly closed shoulder strap.  That's the beauty of making your own clothes and using free patterns online, you can alter and make changes as you wish making the peice even more individual and unique.


 Piping and gathering on the skirt


Saturday, April 21, 2012

Making an Itty Bitty Baby Dress

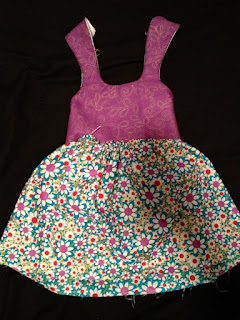
Here's a baby dress Im working on that's near completion. I still need to finish the back bodice, attach it to the front bodice and once that is complete I need to hem the bottom the skirt. I'm going to add some bias piping between the bodice and the skirt before I attach it and make it one piece. I'll update once I've completed. I'm on a break in Astrology class and can't wait to get home to work on this some more :) Update 4/25/12: Vic text me these pics the other day, he took them of me while I was messing with the gathering on the dress skirt. Never even knew he was taking a picture but glad he did as I am able to insert it in this post :)

Wednesday, April 18, 2012

No Sew Baby Tutu for Eva

Another project I'm working on is this no sew Tutu.  I got the idea off a Youtube video which I will post the link to once the tutu is complete and because I have to look for it again.  I want to add a row or two more for added fullness.  The materials I used were Tulle, Organza, and a crochet stretch headband to which I added my strips of tulle to. 


You'd be surprised how easy this is to make and how expensive they can sell for at department stores! Mine so far has cost me under $5 bucks to make! I'm looking forward to making a lot more :)
  

Crafts for Baby

Just wanted to share a few more crafts I've done for Eva.  I've made her a few flowers from Tulle, and a baby bib from 2 different Fat Quarter prints I picked up at Walmart. I made the bib for less than $1.00 considering each Fat Quarter is .99 cents and I still have fabric left over.  I did the back of the bib from an old T-Shirt Vic didn't use anymore to give it more fullness.  I have 2 other bibs I've done for her but need to post pics of. I'm not quite done with the Tulle flowers, I am going to further embellish the centers by adding a jewel, rhinestone, or some other fun embellishment.  I've also made her some bows...this is just one of the many I've made so far.  And I'm currently working on a baby dress for her first month out of the womb! Once I have that complete, I'll post a pic :)


This is a picture of me last week on 4/9. I'm 26 weeks here and my stomach literally grew overnight!
She is literally just popped out and is making her precence well known in this world

Here is a baby bib I completed last week. I'm so proud of this one as its completely finished and the seams are nicely done. I embellished this bib with a bow and some ribbon for a pop of color. 

I made her these bows a few weeks ago and need to update this picture as I've now embellished the centers with pink organza roses I made.  The finished ones look a lot nicer.